How to Wash, Press and Frame a Cross Stitch
Wash by hand in lukewarm water with a little mild soap, swishing rather than rubbing, then rinse, roll in a towel and lay flat. Press it damp, face down on a folded towel, ironing only the back through a cloth. Then lace it over an acid-free board before framing. Each step is quick and each one is easy to get irreversibly wrong.
Wash it, even though it looks clean
The piece in front of you represents a large number of evenings. On the worked example we use throughout these articles, a 140 by 112 portrait on 14 count, the model puts it at 27.7 hours of work and about twelve dollars of thread and fabric. That ratio is worth staring at for a second: the materials are almost free and the time is not, and the finishing is the one stage where an hour of carelessness undoes all of it.
So wash it. Not because it is dirty, but because your hands have been on it for months and skin oil oxidises. It does not show now. It shows in about four years, as a yellow-brown bloom in the areas you held, by which time the piece is sealed behind glass.
The exceptions are hand-dyed fabric, overdyed floss, beads and metallics. If any of those are in there, test on a corner or a spare length first.
The wash itself
Cool to lukewarm water, a basin, and a small amount of mild soap with no bleach and no brighteners in it.
Lay the piece in and swish. Do not rub it, do not scrub at a mark, and above all do not wring it. Cross stitch is a surface of raised loops of loosely twisted cotton, and rubbing fluffs them permanently.
Rinse in clean water and keep changing the water until it runs completely clear, which usually takes more rinses than you expect because soap hides in the stitches. Then lift the piece out supporting the whole thing, lay it on a clean towel, roll the towel up like a swiss roll and press gently to blot.
Leave it flat while you get the iron out. It should be damp, not wet, when you press it.
Pressing, which means ironing the back
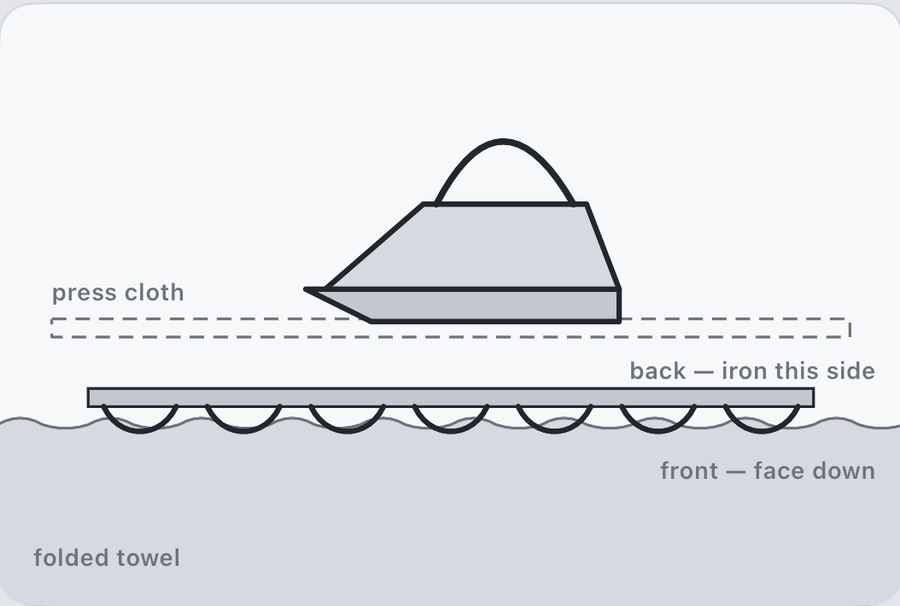
Fold a towel two or three times and lay it on the board. Put the work face down on it, so the raised stitches sink into the pile rather than being crushed flat. Cover the back with a press cloth, a plain cotton tea towel is fine, and iron on the cotton setting.
The front never meets the iron. That is the whole rule, and the reason is that direct heat on the front glazes the floss: it goes slightly shiny and slightly flat, and it stays that way.
Press while damp and the fabric relaxes into shape and stays there. Press it bone dry and you are just setting whatever creases it currently has.
I will admit to skipping the wash on small pieces that go straight into a hoop and never come out. I have regretted it exactly once, on a piece I later wanted to frame properly, and once was enough to make the point.
Mounting
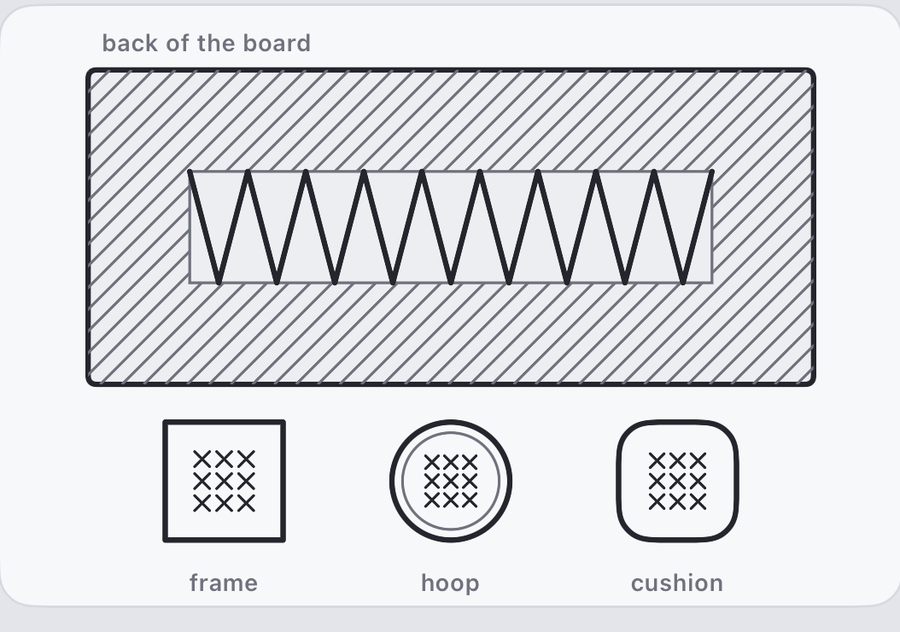
Cut an acid-free board to the size of the finished design. Centre the work on it, fold the margins round the back, and lace them: a long thread taken back and forth across the back from one side to the other, top edge to bottom edge, then the same the other way. Pull the whole lacing up evenly at the end, the way you would tighten a shoe.
Two rules that matter more than the technique:
- No glue and no tape. Acid from tape migrates into the cotton and stains it in a brown line along the edge, and glue is permanent. Lacing is reversible, which is the property you want for something that took a hundred hours.
- Acid-free board, not cardboard. Ordinary greyboard does the same brown edge trick over a decade, just more slowly.
This is where the margin you cut at the very beginning gets used. The rule is about three inches more than the design in each direction, so a 10 by 8 inch piece is cut from 13 by 11 inches of aida. That leaves an inch and a half on each side, which is enough to fold over a board and lace. Cut it tight to the design and there is nothing to hold onto, and the only fixes at that point are stitching an extension strip on or framing it smaller than you meant to. The margin is decided before you buy the cloth, alongside the count and the finished size.
Framing
The design size is the frame size. A 140 by 112 chart on 14 count finishes at exactly 10 by 8 inches and goes into a standard 10 by 8 frame without a mat. Change the count and the frame changes with it, which is a good argument for deciding the frame at the start rather than at the end.
If there is glass, it must not touch the stitches. A mat or a spacer holds it off. Glass pressed against a cross stitch flattens the crosses over a few years and the piece loses its texture, which was most of the point of stitching it.
The other endings
Not everything wants a frame.
- Leave it in the hoop. Trim the fabric to about an inch beyond the ring, run a gathering stitch round the edge and pull it up on the back, then cover the back with a circle of felt. Fast, and it suits small pieces.
- Make it into something. A cushion front, a bag panel, a bookmark, an ornament. This is where a small chart earns its keep, and it is worth choosing the finish before the size so the design fits the object.
- Put it on clothing. A different discipline entirely, because it has to survive washing, and it is covered in stitching on clothes with waste canvas.
If it is not being finished right away, roll it around a tube rather than folding it, and keep it out of the light. Folds set, and a fold across a face is hard to remove after a year.
The sizes and material costs here come from the model that Flossgrid runs on, which works out the piece of cloth to cut, margin included, at the point where you are still choosing the size.
Questions that come up
Should you wash a cross stitch before framing it?
Yes, in nearly every case. Even a piece that looks clean has months of hand oil in it, and oil oxidises slowly into a yellow-brown bloom that appears a few years later when the work is sealed behind glass and impossible to get at. A wash also relaxes the fabric and lets the stitches settle, which is why a washed and pressed piece looks flatter and more even than an unwashed one. The exceptions are hand-dyed fabric or overdyed floss that has not been tested, and anything with beads or metallic thread that will not enjoy water.
What soap should you use?
A small amount of something mild and free of bleach, brighteners and moisturisers. A plain washing-up liquid works, a delicates wash works, and dedicated textile washes work. What to avoid is anything advertised as brightening or whitening, because optical brighteners fluoresce and will make the aida a slightly different white from the day you framed it, and anything with lanolin or conditioner, which leaves a film that attracts dirt.
Can you machine wash a finished cross stitch?
Do not, for a framed piece. The agitation fluffs the surface of the floss and it never quite recovers, and anything on the back that was inadequately anchored comes loose. Stitching on clothing is a different case and is meant to be machine washed: inside out, cool, no tumble dryer for the first few cycles, and pre-washed before you stitched so the garment has already done its shrinking.
How do you get hoop marks and creases out?
Wash it. Most hoop rings and fold lines are simply the fabric holding a shape, and warm water plus lying flat to dry takes them out on its own. Anything left goes when you press the piece damp from the back. What does not come out this way is a crease that has been ironed in dry at high heat, which is one of several reasons the iron goes on the back and never directly on the front.
Does a framed cross stitch need glass?
It needs either glass or an accepted decision to live without it. Glass keeps off dust and cooking grease and, if it is UV filtering, most of the fading. What it must not do is touch the stitches, so the frame needs a mat or a spacer to hold it off, otherwise the raised crosses press against the glass and flatten over the years. Framing without glass is a legitimate choice for a hallway piece and means accepting that it will need washing again one day.
What size frame do I need?
Start from the finished design, not the fabric. A 140 by 112 stitch chart on 14 count aida finishes at exactly 10 by 8 inches, which drops into a standard 10 by 8 frame with no mat at all. The fabric you cut is bigger, about 13 by 11, and all of that extra folds round the back of the mounting board. If you want a mat around the design, add its width to the frame rather than the board.