How to Start Cross Stitch Without a Knot
Two methods cover everything. The loop start folds one strand in half so the loop on the back catches the first stitch, and needs an even number of strands. The away knot puts a temporary knot on the front, a few inches off, and works with any number. Both finish the same way: run the tail under four or five stitches and clip.
The problem with a knot
It is a lump. Everything else follows from that.
On the back of the work, a knot sits proud of the cloth. Stretch the finished piece over a mounting board and that lump becomes a visible dimple on the front, at the exact moment you can no longer do anything about it. A knot also pulls through the weave more easily than people expect, particularly on 11 or 14 count aida, so the reliability argument for knots turns out to run the wrong way.
The two alternatives take about the same time as tying and are both drawn below in cross section, front above the cloth and back below it, because every statement here is about which side of the fabric something is on.
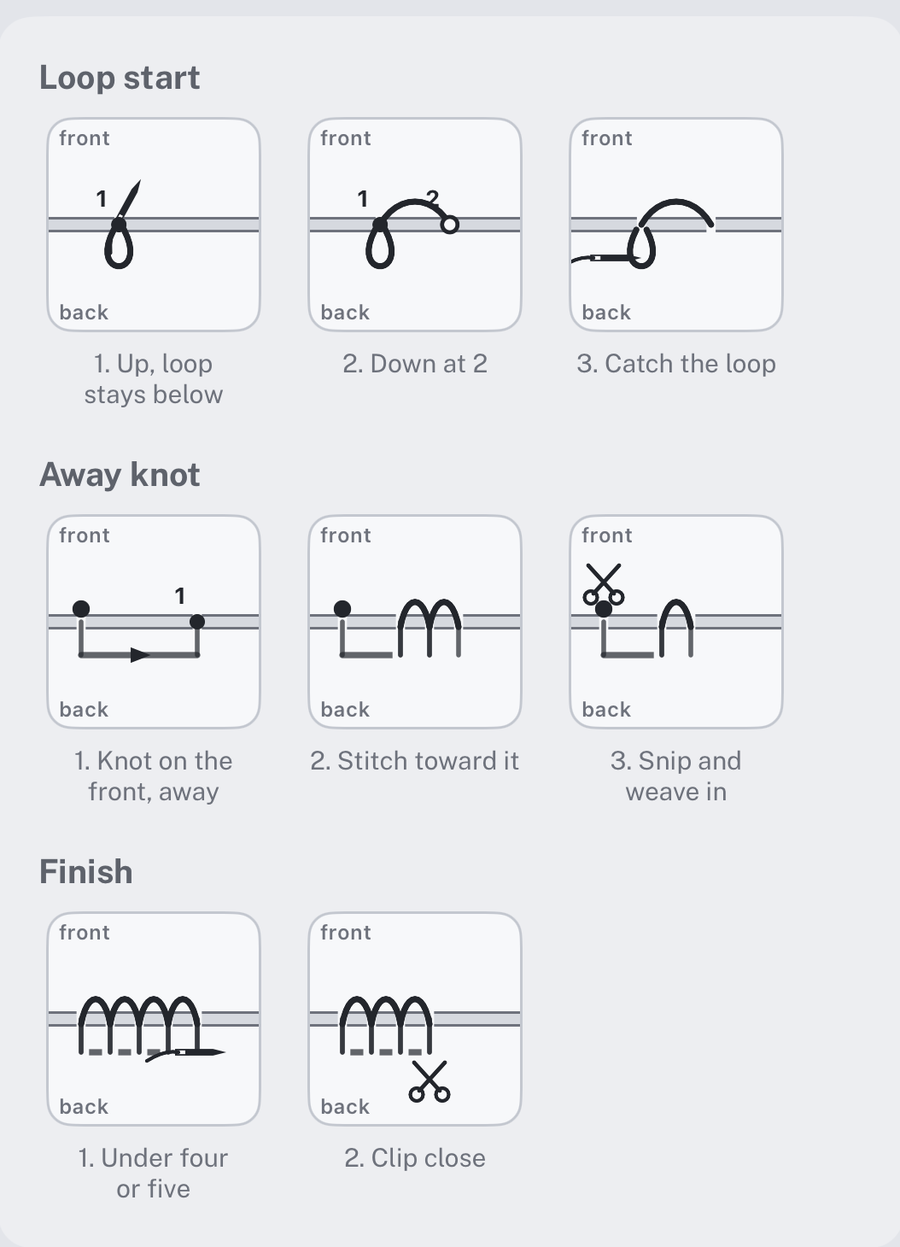
Which one you reach for is decided by arithmetic, not by preference:
| Strands in the needle | Method |
|---|---|
| 1 | away knot |
| 2 | loop start, or away knot |
| 3 | away knot |
| 4 | loop start, or away knot |
Loop start
Only for an even number of strands, which is most cross stitch: two strands is the standard on 14 to 18 count.
- Take one strand, twice as long as you want to work with. Fold it in half.
- Thread both cut ends through the needle. The fold hangs as a loop.
- Come up through the fabric at the first stitch. Pull until the loop is nearly flat against the back but still open.
- Make the first diagonal and take the needle back down.
- Underneath, pass the needle through the loop and pull snug.
The thread is now anchored by itself and there is nothing on the back but thread. Whether this can be your default depends on the strand count your fabric wants, which is set out with the rest of the count arithmetic.
Away knot
Works with any number of strands, including one and three.
- Knot the end normally.
- Take the needle down through the front of the fabric a few inches away from where you will start, in a direction you are going to be stitching toward.
- Come up at the first stitch and work normally. The thread runs along the back from the knot to your work, held down by every stitch you make.
- When your stitching reaches the knot, snip it off the front, thread the loose tail and weave it under the stitches on the back.
Two details do the work. The knot goes on the front, so that cutting it off leaves nothing behind. And it goes in the direction you are heading, so that the tail ends up underneath finished stitching rather than stranded in bare cloth.
I use this for almost everything, including two strand work where the loop start would do. One method that always works beats two that each work sometimes, and the extra step is about four seconds.
Finishing
Identical for both, and for the end of every thread after that.
Turn the work over. Slide the needle under four or five worked stitches, prefer the same colour if there are any, and clip the tail close. That is the whole technique. Four or five gives enough friction to hold for the life of the piece.
The only thing worth being careful about is contrast: a dark tail run under pale stitches will show through white aida once the piece is stretched and lit.
What thread starts actually cost
Every one of these is quick. There are a great many of them.
A 140 by 112 portrait, twelve colours, 14 count, two strands, worked in lengths of 45 cm needs 528 separate needles. At roughly 45 seconds each to cut, separate, thread and anchor, that is 6.6 hours, against 21.1 hours of actual stitching. Nearly a quarter of the project.
The same chart in a single colour needs 352 needles and 4.4 hours of threading, because one thread runs further before it has to change. The number of thread starts is really a property of the chart, not of your technique, and it is one of the better arguments for keeping a palette small. It is also why time estimates that only count stitches come out low.
There is a second cost that nobody counts. Each of those 528 needles leaves about 12 cm in tails: the bit you anchor with, the bit you weave in, the bit too short to keep going. That is 63 metres of thread that never appears on the front, or a little over two and a half skeins.
Where the first stitch goes
Separate question from how to anchor it, and worth getting right in the same sitting, along with the rest of what a first hour contains. Fold the fabric in half both ways, find the arrows marking the centre of the chart, and put the first stitch where those meet. Working outward from the middle keeps a miscount local; working in from a corner lets an error compound until the design runs off the cloth. The rest of that, including what the bold lines and the legend are for, is in how to read a chart.
When a knot is actually fine
Being honest about it: on a small piece that will live inside a hoop and never be stretched over a board, a knot on the back is not going to ruin anything, and plenty of people have stitched for decades that way. The reasons above are real but they are reasons of degree.
The place to be strict is a piece you intend to frame, a piece that will be washed, and anything on clothing, where the back is rubbed against skin every day and a knot is the first thing to fail.
The thread counts on this page come from the model that Flossgrid runs on, and the diagrams are the ones the app shows before your first stitch.
Questions that come up
Why not just tie a knot?
Three reasons, in rising order of annoyance. A knot is a lump, and once the piece is stretched over a mounting board that lump shows as a dimple on the front. A knot pulls through aida more easily than people expect, especially the loose weave of low counts, so it can simply vanish and take your stitching with it. And a back full of knots makes the whole piece sit unevenly, which you notice when you press it. Anchoring under existing stitches takes about the same time and has none of these problems.
How does the loop start work?
Take one strand of floss, twice as long as you want, fold it in half and thread both cut ends through the needle, leaving the fold as a loop. Come up through the fabric where the first stitch goes, make the first half of that stitch and go back down, then pass the needle through the loop on the back and pull it snug. The thread is now held by itself. It only works with an even number of strands, because folding one strand gives you two, and folding two gives you four.
What do you do with an odd number of strands?
An away knot. Tie a knot in the end, take the needle down through the front of the fabric a few inches away from where you are about to work, and come up at the first stitch. The knot sits on the front, holding the tail against the back while you stitch toward it. When you get there, snip the knot off, thread the freed tail and weave it under the stitches you have just made. It works for one strand, three strands, and everything else.
How do you finish a thread without a knot?
Turn the work over, slide the needle under four or five finished stitches on the back, and clip close. Go under stitches of the same colour where you can, because a dark tail travelling under pale stitches shows through white aida. Four or five is enough friction to hold permanently; two is not, and ten is a lump of its own.
Any trick for threading the needle?
Cut the end clean rather than tearing it, and if it is fraying, wet it between your lips or pinch it flat between finger and thumb and push the needle onto the thread rather than the thread through the needle. A needle threader costs almost nothing and is not cheating. If a needle has become hard to thread over time it may simply be worn: the eye of a plated needle roughens with use and starts shredding thread.